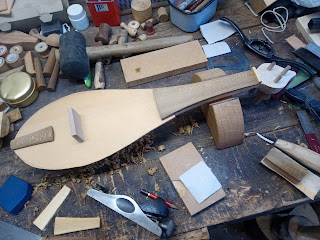
Monday, 19 July 2021
REBEK UPDATE
Feeling pleased with the overall appearance - was concerned my 'f' holes would impair the sound because of the positioning. According to most of the photos I've seen of new and genuine old ones they are positioned more parallel to the bridge but I'm not a slave to tradition and I did give the shapes and positioning a great deal of thought. Laburnum neck and tailpiece are great colours, totally natural with just a light wipe of linseed oil.
Monday, 5 April 2021
Rebec Update
I first started the Rebec in a flush of enthusiasm in 2008 and did loads of work with the adze that summer at shows and events where I was selling my handmade wood wares. Since then it's been on the back burner until these interesting times and the Lock-Up we've had here in Essex, UK.
In fact I'd forgotten about it till I had the biggest workshop tidy up and sort out for years and there it was at the same stage as in the pic below.
It's a Gransfors Bruks Adze and it's one of those tools I go months without using then it's coming out every day. I love using it - goes through wood like butter when you've got the right action.
Almost Ready Stage
I always get caught out at this stage when making things because the tricky work is still to come and after wasting loads of wood with the adze it was on to gouges to get it so we'd have a good sound box.
More Almost Ready Stage
After spending a few more hours last week it was starting to look like a Medieval instrument and I felt pleased that I'd done it using similar methods to the musical instrument makers of the past - similar tools and a similar amount of energy! Feeling positive now and have been re-reading Zachary Taylor's book for hints and tips and got sidetracked with that
Taking the Shape of a Rebec
Finger board and tail piece are Laburnum, the bridge and pegs are London Plane, top is Spruce and the nut is Box. I was able to use the neck support I'd made to set up the bass guitar I chatted about last week and it's great when bits of kit you make turn out to be multi functional. Thank goodness I've a big workbench - must have had everything bar the kitchen sink out to use. That's when you know for sure you can never have too many tools!
Here you can see the pegs - had to do some carefulcarving on these to ensure they could all be turned independently without jamming into each other - made a mental note that next time I make a Rebec to drill the holes just slightly further apart from each other!
This afternoon I'm going to design the fret holes, I've been looking at loads of images of ancient instruments in museums - don't think I'll be doing a super fancy design - I've heard that can impair the sound. So think I'll be going for something minimal going for the 'less is more' approach...
Wednesday, 13 May 2020
TURNING a SPINNING TOP - A Power Lathe or Pole Lathe
Power Lathe or Pole Lathe - That is the Question???
I've a power lathe with 10 foot bed in the workshop - it's an Apollo - hand built and a beautiful piece of engineering. I spoke to the chap who made it and he was still in love with my model and could actually remember making it when I chatted with him on the phone. So I've been making more treen using power and it's something that's taking me a long time to get used to. I've also acquired a pillar drill and bandsaw - all very horrible, noisy and dusty! So I've also had to invest in an industrial type hoover and a proper extractor and a ventilating head vizor mask thing to protect my lungs from dust. So I decided I'd still turn the wood green, one I like the ribbon shavings and two you don't get the dust. Also I can turn as slowly or as fast as I do on the Pole Lathe.So spinning top time and I did use my axe to start to rough out my billet but stopped myself and used the machinery! This is all in aid of my back which I'm really careful of ever since I had an attack of sciatica which took months to recover from, so remember folks look after your back!
 |
| Billet prepared with Band Saw |
Then for a bit of turning to get a good shape.
 |
| Power Lathe |
Used the pillar drill to get the holes good and parallel - now I do really appreciate this power tool much less strenuous on the chest and shoulders!
 |
| Pillar Drill |
Shaping is fun - plenty of beads & coves, decorate with black lines, think of the centre of gravity and you should be fine.
 |
| Spinning Top Components |
Separate the components, carve your point and your just about set for a record breaking spinner. I used a Hazel twig for my puller - looks good and does the job.
 |
| Spinning Top |
And the movie of how well it balances and the speed it goes at - it's half time speed folks that's why the parakeets sound like a horror movie in the background! And then have a look here at the movie Making a Spinning Top using a Pole Lathe for the same process - I know which one I prefer...
 |
| Spinning Top Movie |


